> ## Documentation Index
> Fetch the complete documentation index at: https://developer.worldly.io/llms.txt
> Use this file to discover all available pages before exploring further.
# Getting Started with Worldly APIs
> Here you'll find documentation and examples to help you start working with the Worldly APIs as quickly as possible, as well as support if you get stuck. Let's jump right in!
## Welcome to the Worldly Public API!
You can use our API to access Worldly Public API endpoints, which allows you to access module data that your account owns or that has been shared with your account.
We have language bindings in Shell (curl) and JavaScript.
## How to authenticate
* Select **Account** in the top-right dropdown and select **Integrations** on the nav bar
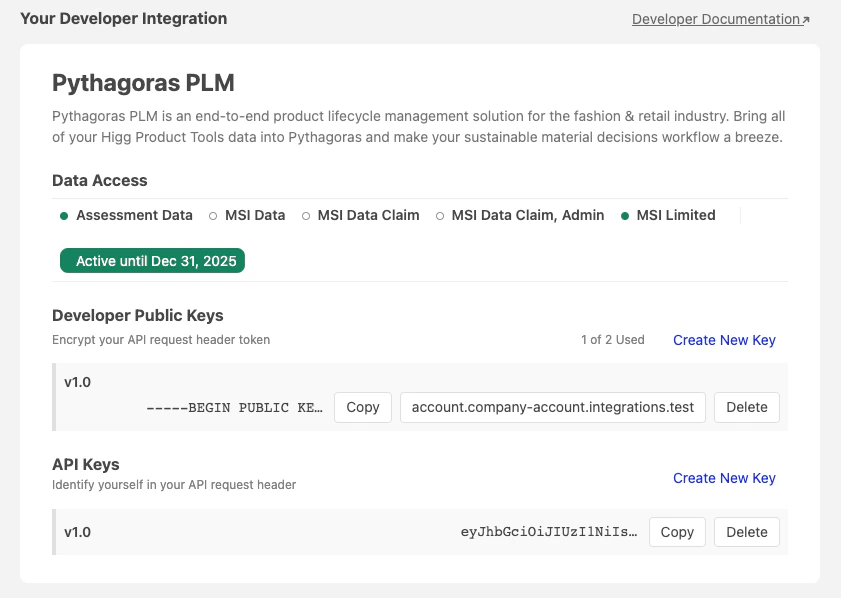
* Select **Your Developer Integration**. Create both Developer Public Keys and API Keys
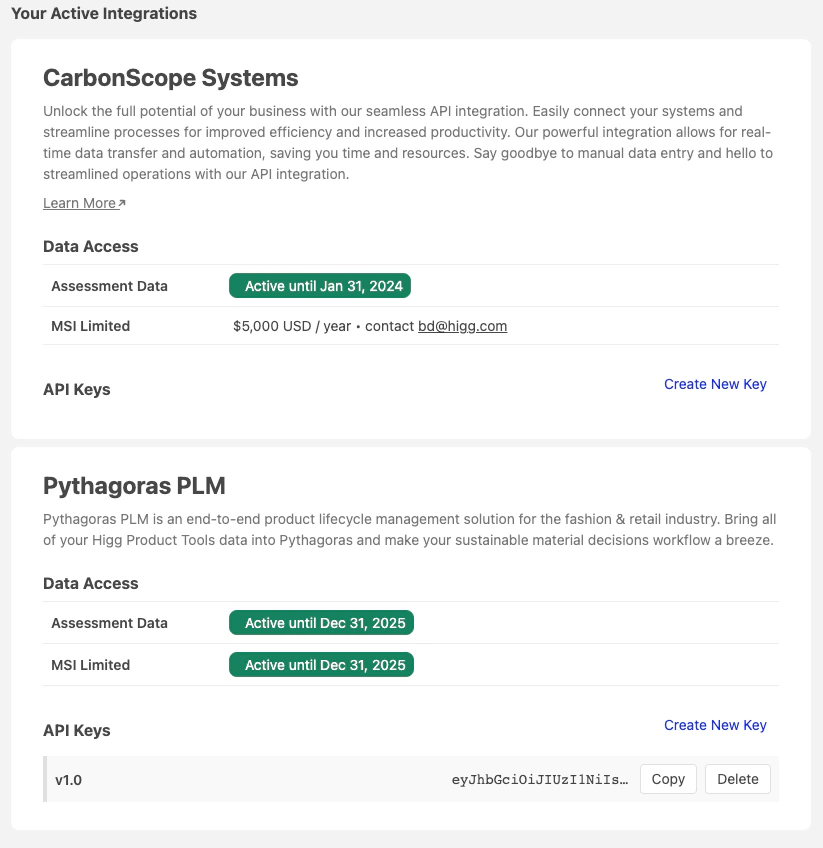
* Scroll to **Your Active Integrations** and create API Keys
 ### Encrypting your API Key
Please be sure you have the latest version of OpenSSL installed on your machine
* Copy an API Key created on your Developer Integration and paste it into an `x-api-key` header param when making a public API request
* Copy a Public Key on your Developer Integration and paste it into a **public.pem** file
* Copy an API Key created on your Active Integrations and paste it into a **secret.txt** file. Append a recent timestamp to the Key such as `&2023-02-14T10:11:12Z`
You will need to [regenerate and reinsert](https://www.unixtimestamp.com/) a new ISO-formatted timestamp with your API Key every 12 hours in order to get a 200 response
* Run the command on the same directory of the secret.txt file created:
```text theme={null}
openssl pkeyutl -encrypt -pubin -inkey public.pem -in secret.txt | base64
```
* Copy the result of the previous command and paste it into a `x-developer-request-token` header param when making a public API request
* Make a request to the new version of the public API and check the results. Example:
```bash theme={null}
curl --location --request POST 'https://api-v2.production.higg.org/api/v1/moduledata/fem' \
--header 'Content-Type: application/json' \
--header 'x-api-key: ' \
--header 'x-developer-request-token: ' \
--data-raw '{
"from": 0,
"size": 10
}'
```
### Tips for authentication workflow
* Add the secret.txt file for each unique token in its own, separate directory folder. Open the Terminal from that folder when running the base64 encryption to ensure the correct secret.txt token is being used
* Add the base64 Terminal command as a local shortcut to easily paste for re-encryption every 12 hours
Switch to **v0.1 (Legacy)** using the version selector at the top of this page.
### Encrypting your API Key
Please be sure you have the latest version of OpenSSL installed on your machine
* Copy an API Key created on your Developer Integration and paste it into an `x-api-key` header param when making a public API request
* Copy a Public Key on your Developer Integration and paste it into a **public.pem** file
* Copy an API Key created on your Active Integrations and paste it into a **secret.txt** file. Append a recent timestamp to the Key such as `&2023-02-14T10:11:12Z`
You will need to [regenerate and reinsert](https://www.unixtimestamp.com/) a new ISO-formatted timestamp with your API Key every 12 hours in order to get a 200 response
* Run the command on the same directory of the secret.txt file created:
```text theme={null}
openssl pkeyutl -encrypt -pubin -inkey public.pem -in secret.txt | base64
```
* Copy the result of the previous command and paste it into a `x-developer-request-token` header param when making a public API request
* Make a request to the new version of the public API and check the results. Example:
```bash theme={null}
curl --location --request POST 'https://api-v2.production.higg.org/api/v1/moduledata/fem' \
--header 'Content-Type: application/json' \
--header 'x-api-key: ' \
--header 'x-developer-request-token: ' \
--data-raw '{
"from": 0,
"size": 10
}'
```
### Tips for authentication workflow
* Add the secret.txt file for each unique token in its own, separate directory folder. Open the Terminal from that folder when running the base64 encryption to ensure the correct secret.txt token is being used
* Add the base64 Terminal command as a local shortcut to easily paste for re-encryption every 12 hours
Switch to **v0.1 (Legacy)** using the version selector at the top of this page.